AWS CDK Starter - Lightweight Monorepo
#AWS CDK Starter - Lightweight Monorepo
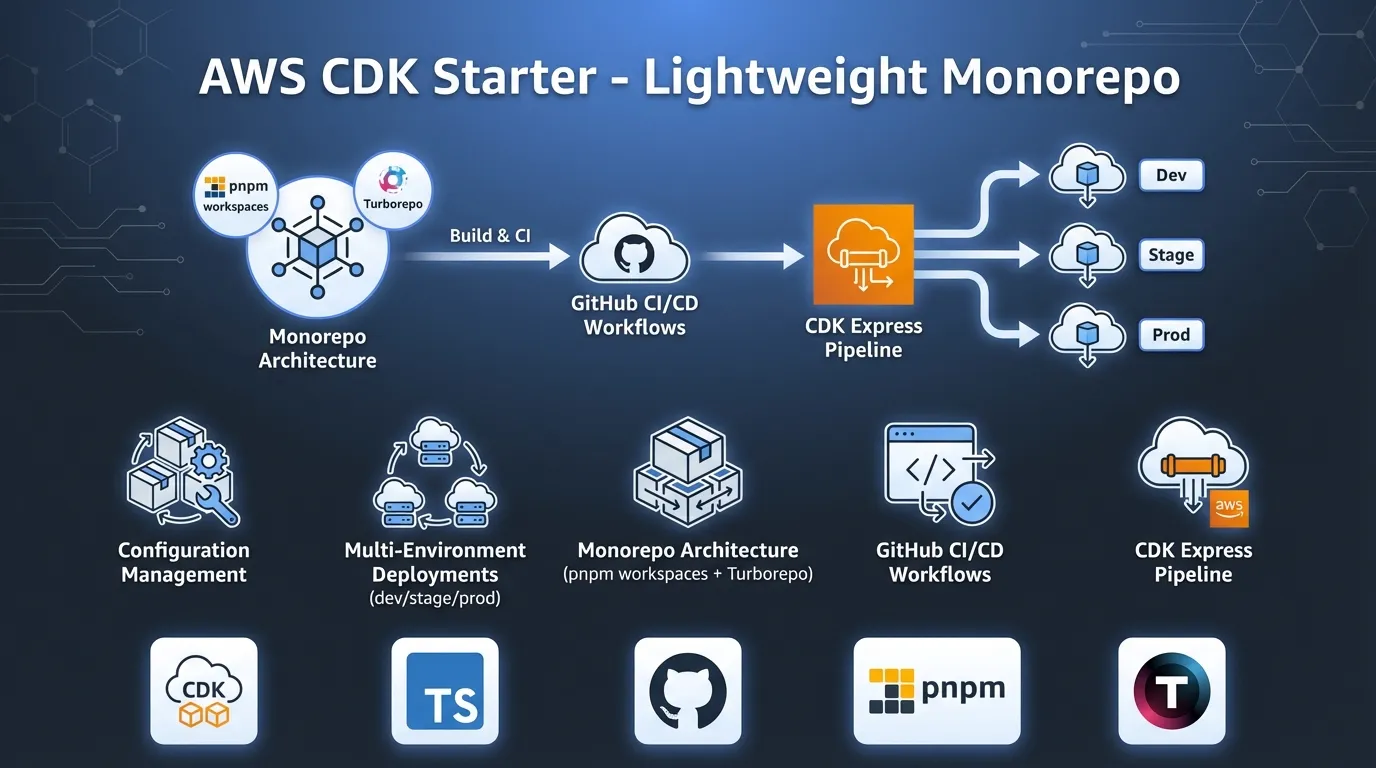
In this post, I’ll walk you through an updated production ready CDK starter that I’ve been refining over the past year. After using the 2024 version across several projects, I learned what worked well and what needed improvement. This version is lighter, faster, and easier to maintain.
The starter provides configuration management, multi environment deployments, monorepo architecture with pnpm & Turborepo, and automated GitHub CI/CD workflows. The code is available here: https://github.com/rehanvdm/cdk-starter.
This repo is a GitHub Template. Just click the “Use this template” button to create your own copy with a clean git history.
#Table of Contents
- What we are deploying
- Monorepo Structure
- Build System: pnpm Workspaces and Turborepo
- CI/CD with cdk-express-pipeline
- Branching Strategy and Workflows
- Multiple Environments (dev, stage, prod)
- Formatting, Linting and GitHub Pipeline generation
- Differences from 2024 Starter
- Conclusion
#What we are deploying
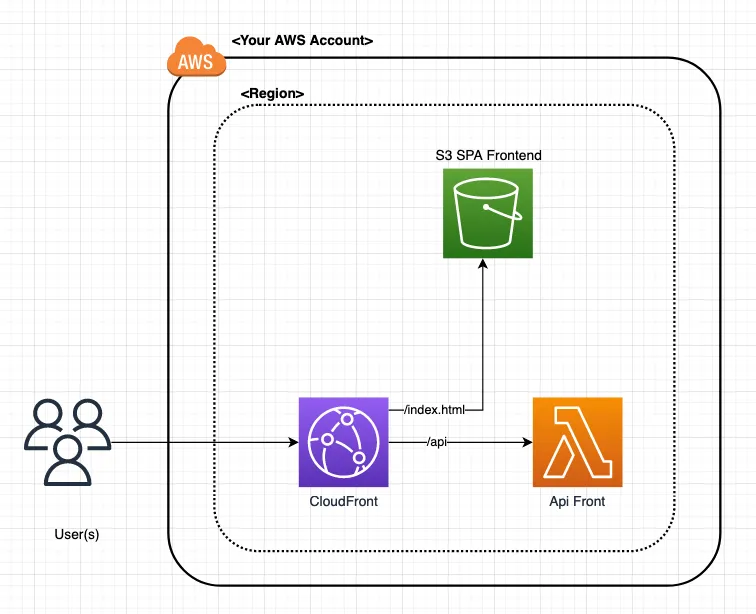
Figure 1: High-level architecture showing the Backend Lambda with Function URL and Frontend CloudFront distribution with reverse proxy configuration
The architecture is kept simple. It’s meant as a starting point showing AWS resource patterns, stack dependencies, and deployment orchestration.
The starter project consists of two main stacks:
Backend Stack (/infra/stacks/backend.ts):
- A TypeScript Lambda function that returns a random number via Function URL
- Environment variables control the min/max range (from environment config)
- Exposes the Function URL origin for the Frontend to consume
Frontend Stack (/infra/stacks/frontend.ts):
- CloudFront distribution serving a simple
index.htmlwith a link that opens the/apipath when clicked - Reverse proxies the
/apipath to the Backend Lambda Function URL that returns a random number - The reverse proxy avoids CORS by keeping everything on the same domain
#Monorepo Structure
The project uses pnpm workspaces to organize code into logical packages:
.
├── .github/
│   ├── actions/                                  # Auto-generated by cdk-express-pipeline
│   └── workflows/                                # Auto-generated by cdk-express-pipeline
│       ├── cdk-express-pipeline-diff-{dev|prod|stage}.yml
│       ├── cdk-express-pipeline-deploy-{dev|prod|stage}.yml
│       ├── test.yml
│       └── validate.yml
├── app/
│   ├── backend/
│   │   └── api/                                  # Backend Lambda (@app/backend-api)
│   │       ├── dist/                             # Generated by the build command
│   │       ├── src/
│   │       │   ├── index.ts                      # Lambda handler
│   │       │   ├── index.spec.ts                 # Lambda handler tests
│   │       │   └── environment.ts                # Type-safe env vars
│   │       └── package.json
│   └── frontend/                                 # Frontend site (@app/frontend)
│       ├── dist/                                 # Generated by the build command
│       ├── src/
│       │   └── index.html                        # Static site
│       └── package.json
├── infra/                                        # Infrastructure (@app/infra)
│   ├── dist/                                     # Generated by the build command
│   ├── config/
│   │   └── index.ts                              # Environment configurations
│   ├── stacks/
│   │   ├── backend.ts                            # Backend CDK stack
│   │   └── frontend.ts                           # Frontend CDK stack
│   ├── index.ts                                  # CDK app entry point and pipeline definition
│   ├── cdk.json
│   └── package.json
├── pnpm-workspace.yaml                           # Workspace definition
├── turbo.json                                    # Build orchestration
└── package.json                                  # Root package
This structure gives us:
- Clear boundaries: Each package has explicit dependencies
- Better caching: Build tools can cache per package
- Easier testing: Test packages in isolation
#Build System: pnpm Workspaces and Turborepo
Let’s take a closer look at the build system. It uses pnpm workspaces for package management and Turborepo for build orchestration.
#Workspace Definition
If you are not familiar with pnpm workspaces, they allow you to manage multiple packages in a single repository. We are not publishing these packages to a registry. We only use workspaces for local development and dependency management within the repo.
pnpm-workspace.yaml:
packages:
  - 'app/backend/api'
  - 'app/frontend'
  - 'infra'
This tells pnpm that these three directories are workspace packages that can reference each other. The package names
are defined in their respective package.json files.
app/backend/api/package.json:
{
  "name": "@app/backend-api",
  // ...
}
The starter has three packages: @app/backend-api, @app/frontend, and @app/infra. The infra package depends on
the app packages using workspace:* dependencies.
infra/package.json:
{
  "name": "@app/infra",
  "dependencies": {
    "@app/backend-api": "workspace:*",
    "@app/frontend": "workspace:*",
    "aws-cdk-lib": "2.236.0",
    "cdk-express-pipeline": "^2.2.0"
  }
}
This dependency setup is important because it allows Turborepo to understand the dependency graph between packages for build orchestration.
PNPM has excellent features that we did not explore in this starter. Two of my favorites are:
- Catalog dependency management: So that all your packages use the same version of dependencies
- Package minimum release age: Reduce the risk of installing compromised packages
#Build Orchestration
Turborepo is a build system for JS and TS codebases. It works great with pnpm workspaces and provides automatic dependency resolution, caching and incremental builds.
turbo.json:
{
  "$schema": "https://turbo.build/schema.json",
  "tasks": {
    "build": {
      "dependsOn": ["^build"],
      "outputs": ["dist/**"]
    },
    "test": {
      "dependsOn": ["^build"]
    }
  }
}
The ^build dependency means “run the build task in all dependencies first”. Since the infra package depends on the
app packages using workspace:* dependencies, Turborepo will automatically build the backend and frontend packages
first, before building the infra package. It will also cache these builds so that unchanged packages are not rebuilt.
This saves a lot of time in larger projects.
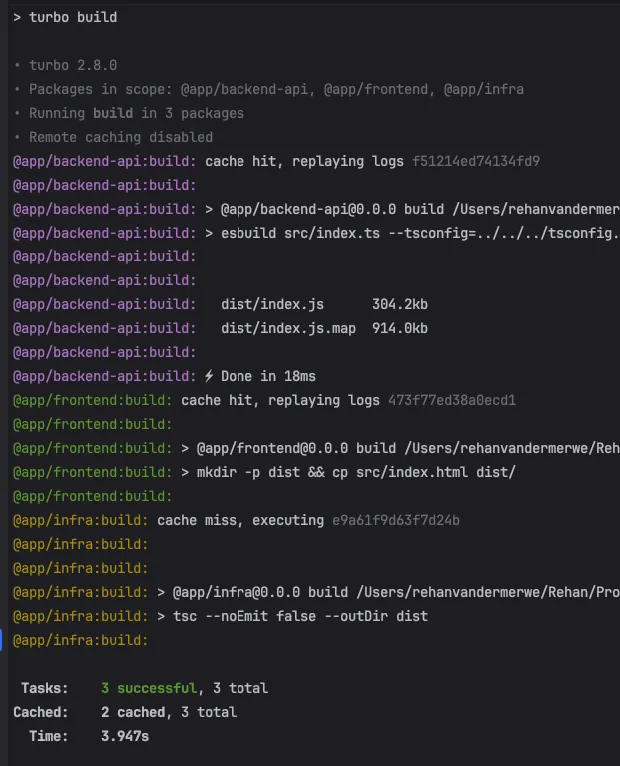
Figure 2: Turborepo automatically resolves package dependencies and determines the correct build order
This pnpm workspace + Turborepo setup can be used for non TS projects as well. Define a package.json in each app
directory with a build script appropriate for that package/language.
Turborepo has many more features of which my favorite has to be remote caching that can speed up builds locally across your team and in CI.
#CI/CD with cdk-express-pipeline
CDK Express Pipeline allows you to define pipelines in a
CDK-native method. It leverages the CDK CLI to compute and deploy the correct dependency graph between Waves, Stages,
and Stacks using the .addDependency method. This makes it build system agnostic and an alternative to AWS CDK
Pipelines.
Instead of manually writing workflow YAML files, you define your deployment pipeline in TS next to your CDK code.
Running any cdk command then generates GitHub Actions & Workflows. Your CI/CD becomes infrastructure as code. The CDK
Express Pipeline also gives us a rich CDK diff on PRs.
#Key Features
- Build System Agnostic: Works on any system like your local machine, GitHub, or GitLab
- Waves and Stages: Define your pipeline structure using Waves and Stages
- Uses CDK CLI: Uses the
cdk deploycommand to deploy your stacks - Multi Account and Multi Region: Supports deployments across multiple accounts and regions made possible by
cdk bootstrap - Fast Deployments: Makes use of concurrent/parallel Stack deployments
- Multi Language Support: Supports TS and Python CDK
- Generated Mermaid Diagrams: Generates diagrams for your pipeline structure
- Generated CI Workflows: Generates CI workflows for your pipeline (only GitHub Actions supported for now, others welcome)
#Pipeline Structure - Waves and Stages
The pipeline uses waves and stages to organize deployments:
- Waves are deployed sequentially, one after the other
- Stages within a Wave are deployed in parallel by default unless configured to be sequential
- Stacks within a Stage are deployed in order of stack dependencies within a Stage
For this starter, we have 2 waves, each with 1 stage:
infra/index.ts:
import { CdkExpressPipeline } from "cdk-express-pipeline";

const expressPipeline = new CdkExpressPipeline();

// Wave 1: Backend
const backendWave = expressPipeline.addWave("backend");
const backendAppStage = backendWave.addStage("app");
const backend = new Backend(app, "api-" + envConfig.env, backendAppStage, { env: awsEnv }, envConfig);

// Wave 2: Frontend (deployed after backend)
const frontendWave = expressPipeline.addWave("frontend");
const frontendAppStage = frontendWave.addStage("app");
new Frontend(app, "website-" + envConfig.env, frontendAppStage,  { env: awsEnv }, envConfig, {
  apiOrigin: backend.apiOrigin
});

expressPipeline.synth([
  backendWave,
  frontendWave
], true, {});We are adding the environment to the stack ID so that we can deploy multiple environments to the same AWS account. CDK Express Pipeline works across multiple accounts and regions out of the box.
#Deployment Order Visualization
CDK Express Pipeline shows you the deployment order in the CLI:
ORDER OF DEPLOYMENT
🌊 Waves  - Deployed sequentially.
🏗 Stages - Deployed in parallel by default, unless the wave is marked `[Seq 🏗]` for sequential stage execution.
📦 Stacks - Deployed after their dependent stacks within the stage (dependencies shown below them with ↳).
           - Lines prefixed with a pipe (|) indicate stacks matching the CDK pattern.
           - Stack deployment order within the stage is shown in square brackets (ex: [1])

| 🌊 backend
|   🏗 app
|     📦 api-dev (backend_app_api-dev) [1]
| 🌊 frontend
|   🏗 app
|     📦 website-dev (frontend_app_website-dev) [1]

backend_app_api-dev (api-dev)
frontend_app_website-dev (website-dev)
...
Note the stack IDs (used to select stacks to deploy) are different from the stack names. This allows us to use patterns
to select stacks. For example, to deploy the backend wave, we can use the pattern backend_* to target all the
stacks in that wave. But the name of the stack is still short. It will show as api-dev in the AWS Console. More on
stack selectors in the CDK Express Pipeline docs.
It also generates a mermaid diagram:
infra/pipeline-deployment-order.md:
%3b%7d%23mermaid-0 .cluster rect%7bfill:hsl(0%2c 0%25%2c 98.9215686275%25)%3bstroke:%23707070%3bstroke-width:1px%3b%7d%23mermaid-0 .cluster text%7bfill:%23333%3b%7d%23mermaid-0 .cluster span%7bcolor:%23333%3b%7d%23mermaid-0 div.mermaidTooltip%7bposition:absolute%3btext-align:center%3bmax-width:200px%3bpadding:2px%3bfont-family:arial%2csans-serif%3bfont-size:12px%3bbackground:hsl(-160%2c 0%25%2c 93.3333333333%25)%3bborder:1px solid %23707070%3bborder-radius:2px%3bpointer-events:none%3bz-index:100%3b%7d%23mermaid-0 .flowchartTitleText%7btext-anchor:middle%3bfont-size:18px%3bfill:black%3b%7d%23mermaid-0 rect.text%7bfill:none%3bstroke-width:0%3b%7d%23mermaid-0 .icon-shape%2c%23mermaid-0 .image-shape%7bbackground-color:white%3btext-align:center%3b%7d%23mermaid-0 .icon-shape p%2c%23mermaid-0 .image-shape p%7bbackground-color:white%3bpadding:2px%3b%7d%23mermaid-0 .icon-shape rect%2c%23mermaid-0 .image-shape rect%7bopacity:0.5%3bbackground-color:white%3bfill:white%3b%7d%23mermaid-0 .label-icon%7bdisplay:inline-block%3bheight:1em%3boverflow:visible%3bvertical-align:-0.125em%3b%7d%23mermaid-0 .node .label-icon path%7bfill:currentColor%3bstroke:revert%3bstroke-width:revert%3b%7d%23mermaid-0 :root%7b--mermaid-font-family:arial%2csans-serif%3b%7d%3c/style%3e%3cg%3e%3cmarker id='mermaid-0_flowchart-v2-pointEnd' class='marker flowchart-v2' viewBox='0 0 10 10' refX='5' refY='5' markerUnits='userSpaceOnUse' markerWidth='8' markerHeight='8' orient='auto'%3e%3cpath d='M 0 0 L 10 5 L 0 10 z' class='arrowMarkerPath' style='stroke-width: 1%3b stroke-dasharray: 1%2c 0%3b'/%3e%3c/marker%3e%3cmarker id='mermaid-0_flowchart-v2-pointStart' class='marker flowchart-v2' viewBox='0 0 10 10' refX='4.5' refY='5' markerUnits='userSpaceOnUse' markerWidth='8' markerHeight='8' orient='auto'%3e%3cpath d='M 0 5 L 10 10 L 10 0 z' class='arrowMarkerPath' style='stroke-width: 1%3b stroke-dasharray: 1%2c 0%3b'/%3e%3c/marker%3e%3cmarker id='mermaid-0_flowchart-v2-circleEnd' class='marker flowchart-v2' viewBox='0 0 10 10' refX='11' refY='5' markerUnits='userSpaceOnUse' markerWidth='11' markerHeight='11' orient='auto'%3e%3ccircle cx='5' cy='5' r='5' class='arrowMarkerPath' style='stroke-width: 1%3b stroke-dasharray: 1%2c 0%3b'/%3e%3c/marker%3e%3cmarker id='mermaid-0_flowchart-v2-circleStart' class='marker flowchart-v2' viewBox='0 0 10 10' refX='-1' refY='5' markerUnits='userSpaceOnUse' markerWidth='11' markerHeight='11' orient='auto'%3e%3ccircle cx='5' cy='5' r='5' class='arrowMarkerPath' style='stroke-width: 1%3b stroke-dasharray: 1%2c 0%3b'/%3e%3c/marker%3e%3cmarker id='mermaid-0_flowchart-v2-crossEnd' class='marker cross flowchart-v2' viewBox='0 0 11 11' refX='12' refY='5.2' markerUnits='userSpaceOnUse' markerWidth='11' markerHeight='11' orient='auto'%3e%3cpath d='M 1%2c1 l 9%2c9 M 10%2c1 l -9%2c9' class='arrowMarkerPath' style='stroke-width: 2%3b stroke-dasharray: 1%2c 0%3b'/%3e%3c/marker%3e%3cmarker id='mermaid-0_flowchart-v2-crossStart' class='marker cross flowchart-v2' viewBox='0 0 11 11' refX='-1' refY='5.2' markerUnits='userSpaceOnUse' markerWidth='11' markerHeight='11' orient='auto'%3e%3cpath d='M 1%2c1 l 9%2c9 M 10%2c1 l -9%2c9' class='arrowMarkerPath' style='stroke-width: 2%3b stroke-dasharray: 1%2c 0%3b'/%3e%3c/marker%3e%3cg class='root'%3e%3cg class='clusters'/%3e%3cg class='edgePaths'%3e%3cpath d='M176.531%2c232L176.531%2c236.167C176.531%2c240.333%2c176.531%2c248.667%2c176.531%2c256.333C176.531%2c264%2c176.531%2c271%2c176.531%2c274.5L176.531%2c278' id='L_Wave0_Wave1_0' class='edge-thickness-normal edge-pattern-solid edge-thickness-normal edge-pattern-solid flowchart-link' style='%3b' data-edge='true' data-et='edge' data-id='L_Wave0_Wave1_0' data-points='W3sieCI6MTc2LjUzMTI1LCJ5IjoyMzJ9LHsieCI6MTc2LjUzMTI1LCJ5IjoyNTd9LHsieCI6MTc2LjUzMTI1LCJ5IjoyODJ9XQ==' marker-end='url(%23mermaid-0_flowchart-v2-pointEnd)'/%3e%3c/g%3e%3cg class='edgeLabels'%3e%3cg class='edgeLabel'%3e%3cg class='label' data-id='L_Wave0_Wave1_0' transform='translate(0%2c 0)'%3e%3cforeignObject width='0' height='0'%3e%3cdiv xmlns='http://www.w3.org/1999/xhtml' class='labelBkg' style='display: table-cell%3b white-space: nowrap%3b line-height: 1.5%3b max-width: 200px%3b text-align: center%3b'%3e%3cspan class='edgeLabel'%3e%3c/span%3e%3c/div%3e%3c/foreignObject%3e%3c/g%3e%3c/g%3e%3c/g%3e%3cg class='nodes'%3e%3cg class='root' transform='translate(0%2c 274)'%3e%3cg class='clusters'%3e%3cg class='cluster' id='Wave1' data-look='classic'%3e%3crect style='' x='8' y='8' width='337.0625' height='224'/%3e%3cg class='cluster-label' transform='translate(134.953125%2c 8)'%3e%3cforeignObject width='83.15625' height='24'%3e%3cdiv xmlns='http://www.w3.org/1999/xhtml' style='display: table-cell%3b white-space: nowrap%3b line-height: 1.5%3b max-width: 200px%3b text-align: center%3b'%3e%3cspan class='nodeLabel'%3e%3cp%3e%f0%9f%8c%8a frontend%3c/p%3e%3c/span%3e%3c/div%3e%3c/foreignObject%3e%3c/g%3e%3c/g%3e%3c/g%3e%3cg class='edgePaths'/%3e%3cg class='edgeLabels'/%3e%3cg class='nodes'%3e%3cg class='root' transform='translate(37.5%2c 35)'%3e%3cg class='clusters'%3e%3cg class='cluster' id='Wave1Stage0' data-look='classic'%3e%3crect style='' x='8' y='8' width='262.0625' height='154'/%3e%3cg class='cluster-label' transform='translate(113.4609375%2c 8)'%3e%3cforeignObject width='51.140625' height='24'%3e%3cdiv xmlns='http://www.w3.org/1999/xhtml' style='display: table-cell%3b white-space: nowrap%3b line-height: 1.5%3b max-width: 200px%3b text-align: center%3b'%3e%3cspan class='nodeLabel'%3e%3cp%3e%f0%9f%8f%97 app%3c/p%3e%3c/span%3e%3c/div%3e%3c/foreignObject%3e%3c/g%3e%3c/g%3e%3c/g%3e%3cg class='edgePaths'/%3e%3cg class='edgeLabels'/%3e%3cg class='nodes'%3e%3cg class='node default' id='flowchart-Stackfrontend_app_website_dev-1' transform='translate(139.03125%2c 85)'%3e%3crect class='basic label-container' style='' x='-96.03125' y='-27' width='192.0625' height='54'/%3e%3cg class='label' style='' transform='translate(-66.03125%2c -12)'%3e%3crect/%3e%3cforeignObject width='132.0625' height='24'%3e%3cdiv xmlns='http://www.w3.org/1999/xhtml' style='display: table-cell%3b white-space: nowrap%3b line-height: 1.5%3b max-width: 200px%3b text-align: center%3b'%3e%3cspan class='nodeLabel'%3e%3cp%3e%f0%9f%93%a6 website-dev %5b1%5d%3c/p%3e%3c/span%3e%3c/div%3e%3c/foreignObject%3e%3c/g%3e%3c/g%3e%3c/g%3e%3c/g%3e%3c/g%3e%3c/g%3e%3cg class='root' transform='translate(16.453125%2c 0)'%3e%3cg class='clusters'%3e%3cg class='cluster' id='Wave0' data-look='classic'%3e%3crect style='' x='8' y='8' width='304.15625' height='224'/%3e%3cg class='cluster-label' transform='translate(117.609375%2c 8)'%3e%3cforeignObject width='84.9375' height='24'%3e%3cdiv xmlns='http://www.w3.org/1999/xhtml' style='display: table-cell%3b white-space: nowrap%3b line-height: 1.5%3b max-width: 200px%3b text-align: center%3b'%3e%3cspan class='nodeLabel'%3e%3cp%3e%f0%9f%8c%8a backend%3c/p%3e%3c/span%3e%3c/div%3e%3c/foreignObject%3e%3c/g%3e%3c/g%3e%3c/g%3e%3cg class='edgePaths'/%3e%3cg class='edgeLabels'/%3e%3cg class='nodes'%3e%3cg class='root' transform='translate(37.5%2c 35)'%3e%3cg class='clusters'%3e%3cg class='cluster' id='Wave0Stage0' data-look='classic'%3e%3crect style='' x='8' y='8' width='229.15625' height='154'/%3e%3cg class='cluster-label' transform='translate(97.0078125%2c 8)'%3e%3cforeignObject width='51.140625' height='24'%3e%3cdiv xmlns='http://www.w3.org/1999/xhtml' style='display: table-cell%3b white-space: nowrap%3b line-height: 1.5%3b max-width: 200px%3b text-align: center%3b'%3e%3cspan class='nodeLabel'%3e%3cp%3e%f0%9f%8f%97 app%3c/p%3e%3c/span%3e%3c/div%3e%3c/foreignObject%3e%3c/g%3e%3c/g%3e%3c/g%3e%3cg class='edgePaths'/%3e%3cg class='edgeLabels'/%3e%3cg class='nodes'%3e%3cg class='node default' id='flowchart-Stackbackend_app_api_dev-0' transform='translate(122.578125%2c 85)'%3e%3crect class='basic label-container' style='' x='-79.578125' y='-27' width='159.15625' height='54'/%3e%3cg class='label' style='' transform='translate(-49.578125%2c -12)'%3e%3crect/%3e%3cforeignObject width='99.15625' height='24'%3e%3cdiv xmlns='http://www.w3.org/1999/xhtml' style='display: table-cell%3b white-space: nowrap%3b line-height: 1.5%3b max-width: 200px%3b text-align: center%3b'%3e%3cspan class='nodeLabel'%3e%3cp%3e%f0%9f%93%a6 api-dev %5b1%5d%3c/p%3e%3c/span%3e%3c/div%3e%3c/foreignObject%3e%3c/g%3e%3c/g%3e%3c/g%3e%3c/g%3e%3c/g%3e%3c/g%3e%3c/g%3e%3c/g%3e%3c/g%3e%3c/svg%3e)
#Workflow Generation
After defining waves/stages, configure workflow generation:
import { GitHubWorkflowConfig } from "cdk-express-pipeline";

const expressPipeline = new CdkExpressPipeline();
const backendWave = expressPipeline.addWave("backend");
const frontendWave = expressPipeline.addWave("frontend");

expressPipeline.synth([
  backendWave,
  frontendWave
], true, {});

const ghConfig: GitHubWorkflowConfig = {
  directory: path.join(__dirname, "..", ".github"),
  workingDirectory: "infra",
  buildConfig: {
    type: "workflow",
    workflow: { path: "./.github/actions/build" },
  },
  diff: [
    {
      id: "dev",
      on: { pullRequest: { branches: ["develop"] } },
      stackSelector: "stage",
      assumeRoleArn: envConfig.aws.githubDeployRoleArn,
      assumeRegion: envConfig.aws.region,
      commands: {
        dev: {
          synth: `pnpm cdk synth '**' -c env=dev --output=cdk.out/dev`,
          diff: `pnpm cdk diff {stackSelector} --app=cdk.out/dev`,
        },
        stage: {
          synth: `pnpm cdk synth '**' -c env=stage --output=cdk.out/stage`,
          diff: `pnpm cdk diff {stackSelector} --app=cdk.out/stage`,
        },
        prod: {
          synth: `pnpm cdk synth '**' -c env=prod --output=cdk.out/prod`,
          diff: `pnpm cdk diff {stackSelector} --app=cdk.out/prod`,
        },
      },
    },
    // Similar configs for stage (only diff stage + prod) and prod (only diff prod) PRs
  ],
  deploy: [
    {
      id: "dev",
      on: { push: { branches: ["develop"] } },
      stackSelector: "stack",
      assumeRoleArn: envConfig.aws.githubDeployRoleArn,
      assumeRegion: envConfig.aws.region,
      commands: {
        dev: {
          synth: `pnpm cdk synth '**' -c env=dev --output=cdk.out/dev`,
          deploy: `pnpm cdk deploy {stackSelector} --app=cdk.out/dev --concurrency 10 --require-approval never --exclusively`,
        },
      },
    },
    // Similar configs for stage and prod branches
  ],
};

expressPipeline.generateGitHubWorkflows(ghConfig, true);
When you run pnpm --filter @app/infra run build:pipeline (any CDK command), this generates:
- 3 diff workflows for PRs to develop, stage, and main branches
- 3 deploy workflows for pushes to develop, stage, and main branches
- Reusable composite actions in
.github/actions/ - A Mermaid diagram showing deployment order
#Diff workflows
The diff workflows run on PRs to develop, stage, and main branches. They show CDK diffs for the current and
higher environments. For example, a PR to develop shows diffs for dev, stage, and prod.

Figure 3: Automated CDK diff comments on pull requests showing infrastructure changes across all environments
Diffs are done at a stage level (one GitHub Job for all stacks in that stage) and deploys at a stack level (a job per stack). This gives a good balance between granularity and speed. It is configurable. More info at the CDK Express Pipeline docs.
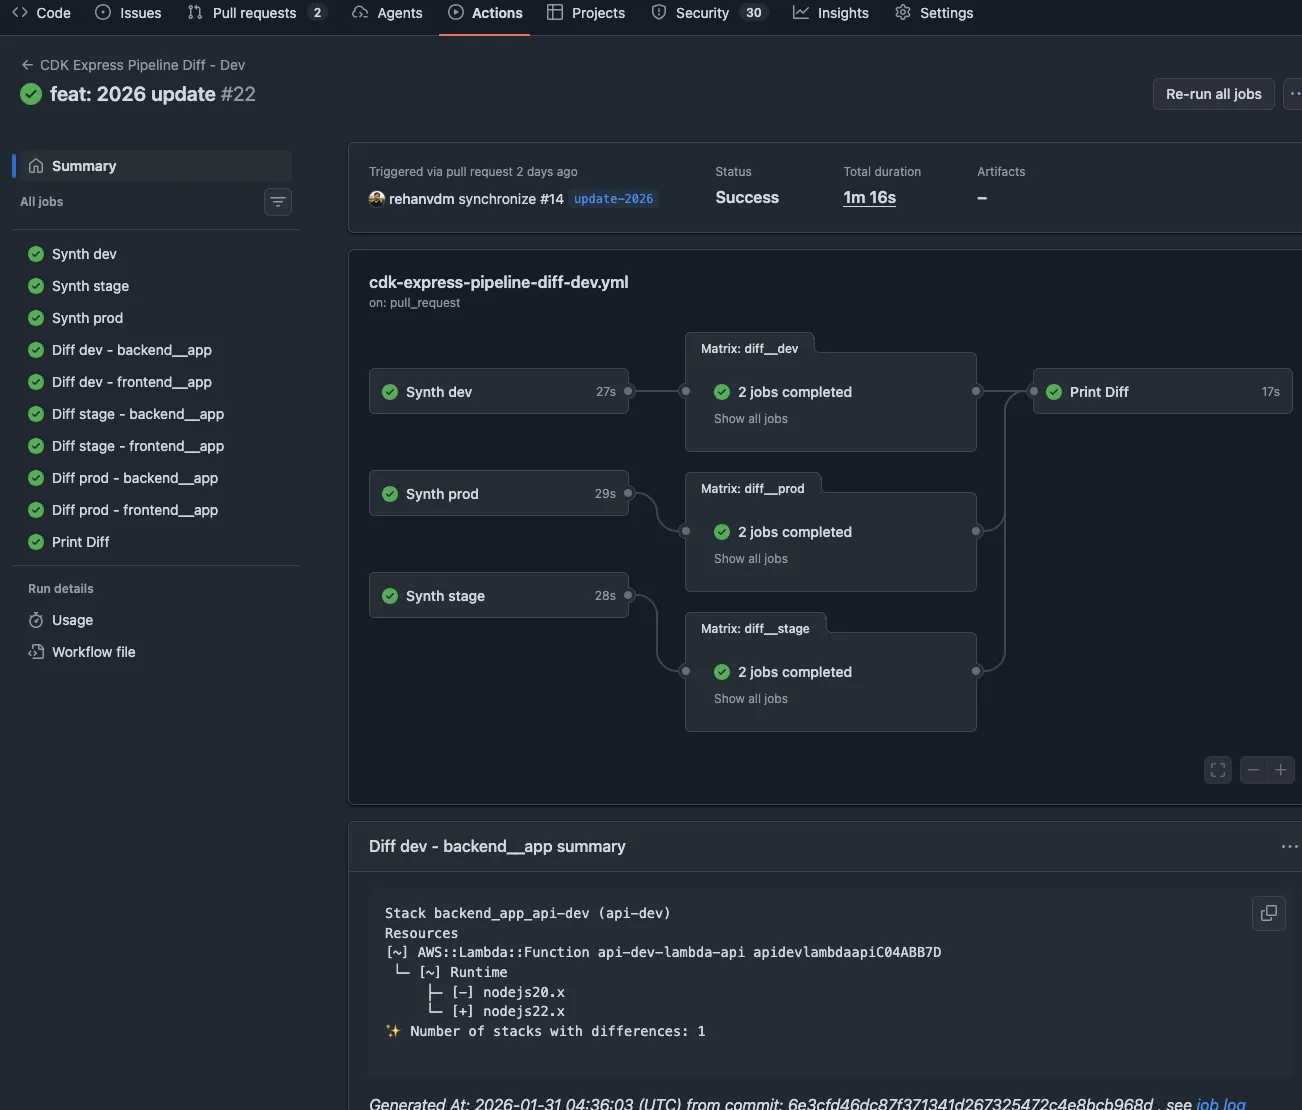
Figure 4: GitHub Actions workflow running CDK diffs in parallel for each stage
#Deploy workflows
The deploy workflows run on pushes to develop, stage, and main branches. They deploy to the respective
environments.
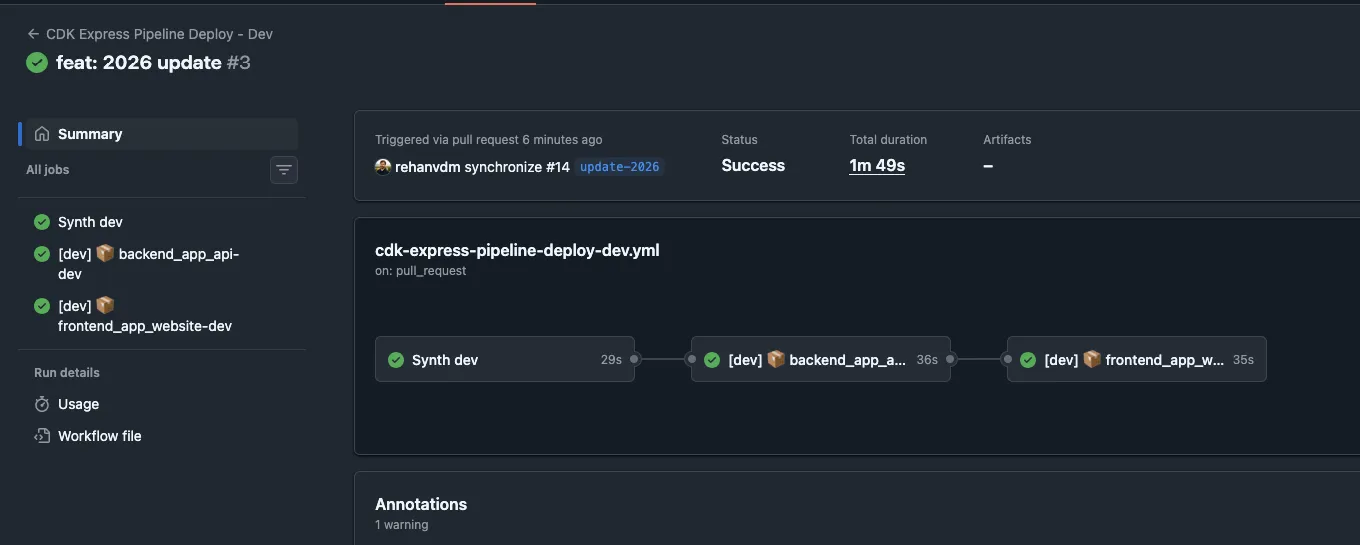
Figure 5: Deployment workflow respecting wave order, backend wave completes before frontend wave begins
#Local deployment
The CDK Express Pipeline is build system agnostic. This means you can run the same deploy commands you run on your CI
locally. It will respect the same waves/stages/stack structure and deploy in the correct order. This is useful for
testing changes before merging PRs to the develop branch.
To deploy all the stacks in the dev environment, run:
pnpm cdk deploy '**' -c env=dev --concurrency 10 --require-approval never --exclusivelyTo deploy only the stacks in the backend wave of the dev environment, run:
pnpm cdk deploy 'backend_*' -c env=dev --concurrency 10 --require-approval never --exclusively#GitHub OIDC Setup
The GitHub to AWS authentication uses IAM roles with OIDC. It is more secure than long lived IAM credentials. You’ll need to manually create this role once (chicken and egg problem, you can’t use CDK to create the role that CDK uses to deploy).
Trust Policy (allows GitHub to assume the role):
{
  "Version": "2012-10-17",
  "Statement": [
    {
      "Effect": "Allow",
      "Principal": {
        "Federated": "arn:aws:iam::YOUR_ACCOUNT:oidc-provider/token.actions.githubusercontent.com"
      },
      "Action": "sts:AssumeRoleWithWebIdentity",
      "Condition": {
        "StringEquals": {
          "token.actions.githubusercontent.com:aud": "sts.amazonaws.com"
        },
        "StringLike": {
          "token.actions.githubusercontent.com:sub": "repo:GITHUB_USERNAME_OR_ORGANISATION_NAME/*"
        }
      }
    }
  ]
}
IAM Policy (allows assuming CDK roles):
{
  "Version": "2012-10-17",
  "Statement": [
    {
      "Sid": "AssumeCdkRoles",
      "Effect": "Allow",
      "Action": ["sts:AssumeRole", "iam:PassRole"],
      "Resource": "arn:aws:iam::YOUR_ACCOUNT:role/cdk-hnb659fds-*"
    }
  ]
}The cdk-hnb659fds-* roles are created when you bootstrap your AWS account/region for CDK deployments. They all have
the same default prefix cdk-hnb659fds-.
Once created, add the role ARN to your environment config in infra/config/index.ts.
More details: Use IAM roles to connect GitHub Actions to actions in AWS
#Branching Strategy and Workflows
The starter follows a simplified gitflow model:
| Environment | Git Branch | On PR (diff) | On Push (deploy) |
|---|---|---|---|
| dev | develop | Diff dev, stage, prod | Deploy to dev |
| stage | stage | Diff stage, prod | Deploy to stage |
| prod | main | Diff prod | Deploy to prod |
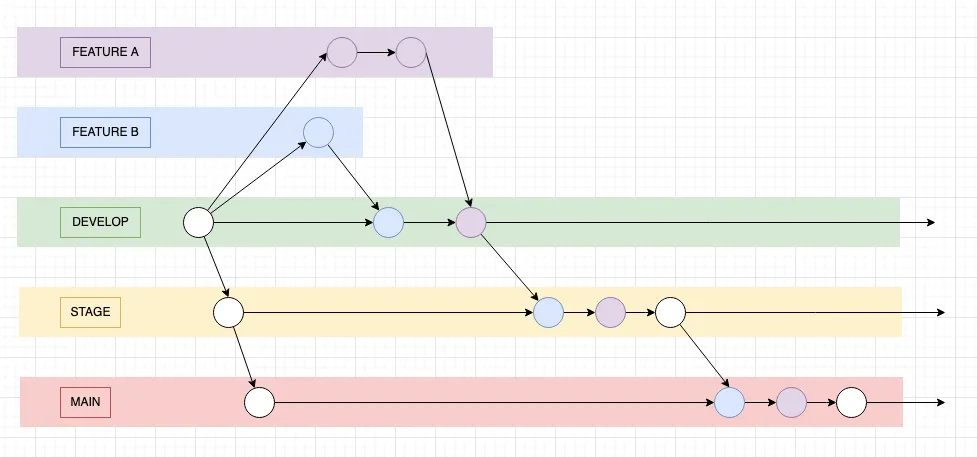
Figure 6: Gitflow inspired branching strategy with three environment branches and promotion workflow
Development process:
- Create
featurebranch fromdevelop - Make changes, commit locally
- PR to develop
- Automated workflows run tests, validation, and CDK diffs for dev, stage, AND prod
- Review PR comments showing infrastructure changes
- Get code review approval
- Squash Merge (so that this only produces a single commit) to develop
- Workflows automatically deploy to dev
- Wait for the deployment to finish and verify changes are working
Promoting to higher environments:
develop→stage: Deploy to Stage by opening a PR fromdeveloptostage, inspect the diffs, get approval, and use a merge commit (preserves the feature branch commits)stage→main: Same process as above but create a PR fromstagetomain
Before merging any PR:
- Check CDK diff output for unexpected changes
- Ensure tests pass
- Get peer code review
- Follow conventional commit naming standard (cheat sheet) for PR titles
- Reference ticket numbers in PR titles or descriptions for proper tracking in issue tracking tools like Jira or Linear
This branching model balances:
- Safety: PRs show diffs for current AND higher environments
- Speed: Merging PRs deploys automatically
- Traceability: Merge commits on
stageandmainpreservedevelopcommit history and are used to indicate when a deployment occurred
A more detailed explanation of this branching strategy can be found in the original starter blog post
#Multiple Environments (dev, stage, prod)
There are currently 3 environments: dev, stage, and prod. These are defined in code.
An important characteristic of any system is determinism. It’s always better to statically store the config. This ensures the same deployment will always produce the same outcome. It is possible to read config dynamically via API with something like AWS SSM Parameters or other means, but this is not considered best practice as your system is no longer deterministic.
infra/config/index.ts:
export type AwsEnvironment = {
  region: string;
  account: string;
  profile: string;
  githubDeployRoleArn: string;
};

export const config: Config = {
  dev: {
    env: "dev",
    aws: {
      region: "us-east-1",
      account: "581184285249",
      profile: "rehan-demo-exported",
      githubDeployRoleArn: "arn:aws:iam::581184285249:role/githuboidc-git-hub-deploy-role",
    },
    randomNumberMin: 1,
    randomNumberMax: 100,
  },
  stage: {
    ... same structure as dev ...
  },
  prod: {
    ... same structure as dev ...
  }
};
We select the environment by passing a CDK context variable called env:
pnpm cdk deploy '**' -c env=dev
pnpm cdk deploy '**' -c env=stage
pnpm cdk deploy '**' -c env=prod#Formatting, Linting and GitHub Pipeline generation
ESLint and Prettier are set up to do linting and formatting alongside tsc to validate TS syntax. These commands
are run by the pnpm run validate command. It can be run manually or left for
Husky to run before committing with Git hooks.
We also run the pnpm --filter @app/infra run build:pipeline that just does the cdk ls --context env=dev command.
This ensures the GitHub workflows are always generated and up to date before committing.
#Differences from 2024 Starter
CLICK TO EXPAND DETAILS
If you read the original 2024 blog post, you’ll notice the core concepts remain the same:
- Type-safe TypeScript configuration
- Multi environment support with deterministic deployments
- Gitflow inspired branching model
- GitHub Actions for CI/CD
What’s changed is the implementation. Here’s a quick comparison:
#Build System
2024: Custom scripts with Wireit + esbuild-runner (esr)
- Custom TypeScript scripts in
/scripts/index.ts - Script commands like
esr ./scripts/index.ts -c cdk -o diff -e dev - Wireit for dependency management and caching
- Single
package.jsonmixing infrastructure and application code
2025: pnpm workspaces + Turbo
- Standard package.json scripts, no custom script files
- Turbo for automatic dependency resolution
- Separate workspace packages for backend, frontend, and infra
- Cleaner separation of concerns
#Project Structure
2024: Shared everything
.
├── config/
├── scripts/                    # Custom build scripts
├── src/                        # All application code
│   ├── backend/                # Backend Lambda
│   └── frontend/               # Frontend static site
├── stacks/                     # CDK stacks
└── package.json                # Single package
2025: Monorepo
.
├── app/
│   ├── backend/
│   │   └── api/                # @app/backend-api
│   └── frontend/               # @app/frontend
├── infra/                      # @app/infra
│   ├── config/
│   └── stacks/
├── pnpm-workspace.yaml
└── turbo.json#GitHub Workflows
2024: Manually written and maintained
- Workflow files hand crafted in YAML
- A single
cdk deploy '**'command to deploy all stacks. This does not scale well with a lot of stacks and dependencies.
2025: Auto generated by cdk-express-pipeline
- Define pipeline structure in TypeScript
- Run any
cdkcommand to regenerate all workflows - Deployment order via waves and stages
- Infrastructure as code for CI/CD
#Stack Definition
2024: Standard CDK stacks
export class Backend extends cdk.Stack {
  constructor(scope: Construct, id: string, stackProps: cdk.StackProps, config: EnvironmentConfig) {
    super(scope, id, stackProps);
    // ...
  }
}
2025: ExpressStack with stages
export class Backend extends ExpressStack {
  constructor(scope: Construct, id: string, stage: ExpressStage, stackProps: cdk.StackProps, config: EnvironmentConfig) {
    super(scope, id, stage, stackProps);
    // ...
  }
}
The ExpressStack and ExpressStage enable cdk-express-pipeline to understand stack dependencies and generate
appropriate workflows.
#Conclusion
The code is available here: https://github.com/rehanvdm/cdk-starter.
This repo is a GitHub Template. Just click the “Use this template” button to create your own copy with a clean git history.
The bottom line is that getting from a basic CDK setup to production ready infrastructure shouldn’t require hours of research and custom scripting. This starter gives you a tested foundation that handles the common patterns so you can focus on building your actual application.
This updated CDK starter provides a lightweight monorepo setup with:
- pnpm workspaces + Turborepo for fast, cached builds
- CDK Express Pipeline that auto generates GitHub workflows from your TypeScript code
- Multi environment support (dev, stage, prod) with type safe configuration
- Gitflow branching model with automatic deployments and rich CDK diffs on PRs
- Clear deployment ordering using waves and stages
The starter is production ready and designed to scale from simple projects to complex multi stack deployments. It eliminates the common pain points of managing CDK infrastructure across multiple environments while keeping everything as code.