AWS CDK starter project - Configuration, multiple environments and GitHub CI/CD
There is a new version available, see the post: AWS CDK Starter - Lightweight Monorepo for an updated and more complete solution.
The codebase used in this blog is still available at https://github.com/rehanvdm/cdk-starter/tree/v2024
This blog will go through the thought process and reasoning involved in setting up a CDK starter project. The starter project can be found here: https://github.com/rehanvdm/cdk-starter/tree/v2024. We will cover topics like configuration, environments, build systems, CI/CD processes and GitHub Workflows.
#Architecture
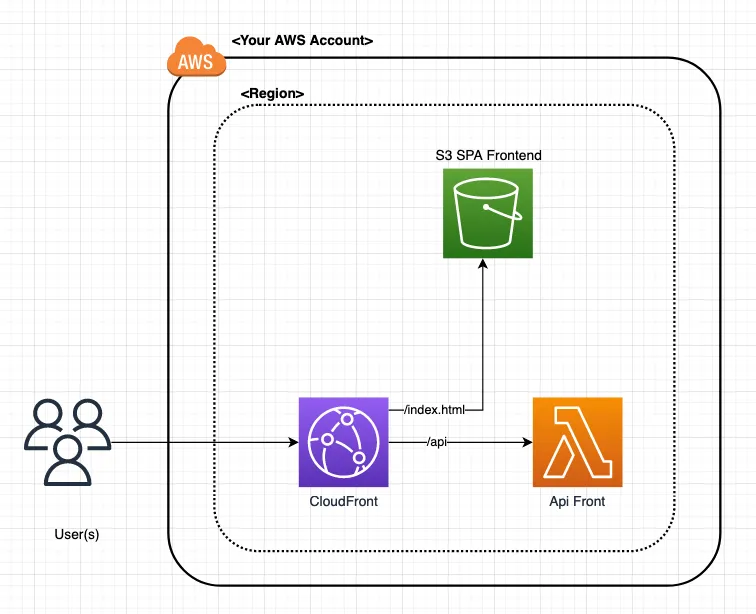
The architecture image above shows the architecture for a single environment. Environments can be deployed in the same or different AWS Accounts and regions. A read-only copy of the draw.io file can be found here.
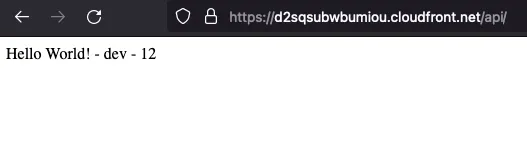
The starter project consists of two CDK stacks defined in /stacks. There is a Backend Stack located at /stacks/backend.ts which deploys a
TypeScript Lambda Function that returns a random number when hit through its Function URL. Environment variables for
the min and max are used for the range in which the random number is generated. These environment variables are passed
in from the configuration determined by the current environment.
The Function URL is then passed using CloudFormation Exports to the Frontend stack located at /stacks/frontend.ts.
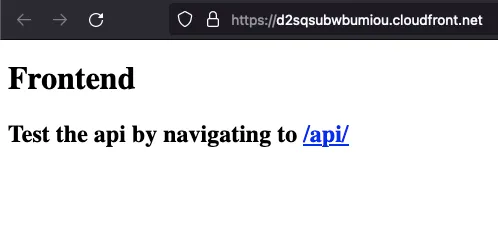
The Frontend stack has a CloudFront that returns a standard index.html with a link to showcase the API is working.
It also reverse proxies the /api path to the Function URL so that the site (index.html) and the API are on the
same domain (this prevents CORS).
index.html
The resources defined are just to have some AWS resources to work with. We intentionally splits the stacks to create dependencies which will be talked about in a future blog.
#Structure and Setup
The standard CDK structure (cdk init) is not used, it never felt “right” to me, but this is a matter of preference.
The current structure is as follows:
/config- The environments and configuration/scripts- The scripts used by the wireit build system/src- Contains application source code like the Lambda code and the frontend website/stacks- AWS CDK stacks and anything CDK related to infrastructure/tests- Vitest tests for application source and optionally CDK infrastructure (cdk tests are not included)index.ts- Is the CDK entry point which is set in thecdk.json
There is a top level package.json used for both application and infrastructure. The same applies for ESLint,
Prettier, Vite and other auxiliary tools.
#Build System - Wireit and ESR
Wireit is used as the build system, it calls actions written in a TS file located at
/scripts/index.ts. These scripts can then be called from the package.json as normal npm run commands, for example:
{
  "name": "cdk-starter",
  "version": "0.0.0",
  "description": "",
  "scripts": {
    ...
    "build-src": "wireit",
    "cdk:diff:dev": "wireit",
    ...
  },
  "wireit": {
    ...
    "build-src": {
      "command": "esr ./scripts/index.ts -c build-src",
      "files": [
        "scripts/index.ts",
        "src/**"
      ],
      "output": [
        "dist/**"
      ]
    },
    "cdk:diff:dev": {
      "command": "esr ./scripts/index.ts -c cdk -o diff -e dev",
      "dependencies": [
        "build-src"
      ]
    },
    ...
  }
}
Calling the npm run cdk:diff:dev command, will in result call the command:
esr ./scripts/index.ts -c cdk -o diff -e devThe script arguments are:
-c cdkThe command to be used is thecdkone. This-cparam must always be passed when calling the script to determine the top level action, other options arevalidateandbuild-src. See /scripts/index.ts for the implementation.-o diffThe operation to use for thecdkcommand, must be one of:diff,deployorhotswap.-e devThe environment to use for thecdkcommand, must be one of:dev,stageorproduction.
The esbuild-runner (esr) package is used to run TS files instead of tsc. It uses
esbuild under the hood which just transpiles and executes TS code. It does not verify
syntax like tsc does, we leave that to the IDE while developing but there are Husky/Git hooks that check this
before committing code as well as GitHub Workflows.
Before wireit calls the cdk:diff:dev command, it will run the commands for its dependencies first, which in this case is
build-src.
We also leverage wireit caching, for example: the build-src command specifies the inputs (files) as the
source directory(/src) and the build script(/scripts/index.ts) and the output of the command
to be in the /dist folder. If the inputs (files) of the command does not change, then the cached output is used, saving
valuable time by only running commands when it is needed.
#Other
#TS Paths
We use TS Paths instead of specifying the relative paths, which can be a nightmare if you refactor or copy and paste within the project and have deep directory structures.
Transforming relative paths that would have looked like:
import { ApiEnv, envToObject as apiEnvToObject } from "../src/backend/lambda/api/environment";
import { EnvironmentConfig } from "../config/index";
To TS Paths that look like:
import { ApiEnv, envToObject as apiEnvToObject } from "@backend/lambda/api/environment";
import { EnvironmentConfig } from "@config/index";
The tsconfig.json that makes this possible is:
{
  "compilerOptions": {
    ...
    "baseUrl": ".",
    "paths": {
      "@tests/*": ["tests/*"],
      "@config/*": ["config/*"],
      "@backend/*": ["src/backend/*"]
    }
  },
  ...
}
Note that you also need to register this with test systems which in this case is Vitest, see vite.config.ts.
#Husky, ESLint, Prettier
ESLint and Prettier are set up to do linting and formatting alongside tsc to validate TS syntax. These commands are
run by the npm run validate command, it can be run manually or left for Husky
to run before committing with Git hooks.
#Configuration
Configuration is stored in TS so that we can define the shape/Type of the configuration object. This is so that we do not have to do runtime validation but rather rely on TS compile time checking. Each environment has a configuration, example shown below.
export type EnvironmentConfig = {
  env: Environment;
  aws: AwsEnvironment;
  randomNumberMin: number;
  randomNumberMax: number;
};
export type Config = Record<Environment, EnvironmentConfig>;

export const config: Config = {
  dev: {
    env: "dev",
    aws: {
      region: "us-east-1",
      account: "111111111111",
      profile: "rehan-dev",
    },
    randomNumberMin: 1,
    randomNumberMax: 100,
  },
  stage: {
    ...
  },
  prod: {
    env: "prod",
    aws: {
      region: "us-east-1",
      account: "333333333333",
      profile: "rehan-prod",
    },
    randomNumberMin: 100,
    randomNumberMax: 1000,
  },
};
Here we can see that each environment is being deployed into there own AWS Account, this is not a requirement but considered best practice. They can also deployed into the same account.
This is made possible by the consistent naming structure used in the project, which just prepends the stack name that includes the environment name. The naming function is not only used to name the AWS resources but also the logical IDs of the constructs, this is not a requirement but just a force of habit.
Their usage is as follows:
...
const app = new cdk.App();
const backend = new Backend(app, "starter-backend-" + envConfig.env, { env: awsEnv }, envConfig);
new Frontend(app, "starter-frontend-" + envConfig.env, { env: awsEnv }, envConfig, {
  apiOrigin: backend.apiOrigin,
});
app.synth();...
export class Backend extends cdk.Stack {
constructor(scope: Construct, id: string, stackProps: cdk.StackProps, config: EnvironmentConfig) {
super(scope, id, stackProps);
function name(name: string): string {
return id + "-" + name;
}
const apiLambda = new lambda.Function(this, name("lambda-api"), {
functionName: name("api"),
...
});
...
}Generates names like:
starter-backend-devfor the Backend stackstarter-backend-dev-apifor the Lambda in the Backend stackstarter-frontend-devfor the Frontend stack
An important characteristic of any system is determinism. It’s always better to statically store the config which ensures the same deployment will always produce the same outcome. It is possible to read config dynamically via API with something like AWS SSM Parameters or other means, but is not considered best practice as your system is no longer deterministic.
#Multiple environments
There are currently 3 environments, dev, stage and prod defined in config/index.ts.
We are tying each environment to a git branch as well as to an AWS Account and Region.
| Environment | Git Branch | AWS Account | AWS Region |
|---|---|---|---|
| dev | develop | 111111111111 | us-east-1 |
| stage | stage | 222222222222 | us-east-1 |
| prod | main | 333333333333 | us-east-1 |
The setup offers the flexibility to deploy all environments into the same AWS accounts (done for example code) or into different AWS accounts (best practice) as shown above. The AWS region can also be varied per environment, but it’s not advised. The current config can be changed to deploy stacks over multiple regions, but this is out of scope for now.
The tie between the CDK and which Environment it uses comes from the -e flag on the
esr ./scripts/index.ts -c cdk -o deploy -e prod command.
For the Git Branch association, it stems by creating GitHub
Workflows and setting that branch as the starting condition. For example the prod environment uses the
.github/workflows/production_deploy.yaml
workflow and specifies that it should run when there are pushes to the main branch.
on:
  push:
    branches:
      - "main"
Then
further down we set the
deploy command as npm run cdk:deploy:prod which in return does the script command mentioned above.
For the sake of simplicity, we won’t create ephemeral environments per developer/feature branch as this can lead to an increase in cost and complexity. It is possible with the current configuration, but it is out of scope for now.
There are lots of benefits to using ephemeral environments like allowing developers to test and experiment with actual deployed resources before committing to the develop branch, but for now we only assume the environments above.
Use feature flags and team communication to collaborate safely on the same main branches.
#CI/CD with GitHub Workflows
We follow a modified/simplified gitflow model, the process looks as follows:
- Developers start work on feature branches that can be named anything
- Make a PR from the feature branch to the
developbranch and merge (squash commit). Code committed to develop must be safe to transition tostageat any point in time. - Make a PR from the
developbranch tostageand merge (merge commit). This allows QA(quality assurance/test team) to test. Fixes to staging can be made by following the usual process offeature->develop->stage. - Make a PR from the
stagebranch tomainand merge (merge commit). Hotfixes to production should be avoided if possible. They can be made by following the usual process offeature->develop->stage->main, or if afeaturebranch is merged tomainthen it must be back merged tostageanddevelop.
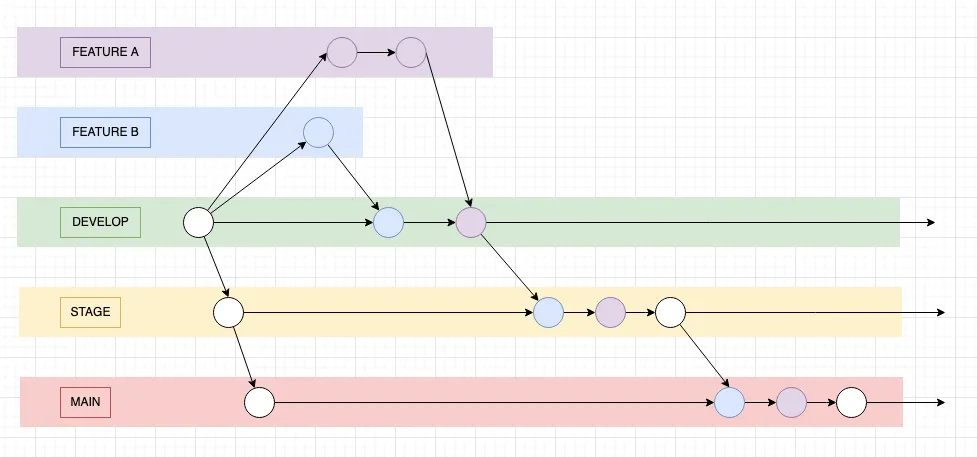
Some of the deviations from gitflow include:
- Feature branches can start with anything
- There is a long-lived
stagebranch instead of short-livedrelease/vX.X.Xbranches - We minimize back merges from higher environments to lower ones and always try to follow the normal route of:
feature->develop->stage->main
To help elevate pushing broken code/infra to the main branches (develop, stage, main) the following actions are
run on PR open:
- A Test workflow that validates the TS syntax, linting and formatting. It also builds the source code and runs tests.
- A Validate workflow that validates
the PR title to follow the conventional commit naming standard
(cheat sheet). Note that we added
releaseto the list of allowedtypesso that we can easily identify when we merge the main branches. - The CDK diff workflows are per
environment and will show the diff for its environment and all higher environments. For example, a PR to
developwill do CDK diffs for thedev,stageandprodenvironments. This is so that you can easily catch errors that are low-hanging fruit, like a name that is too long or to verify certain infra created in only certain environments.
The following recommended process for this setup is not enforced and is out of scope. A future blog will cover GitHub settings to enforce processes with branch protection rules, required checks, rule sets, environments, code reviews, deployment/workflow approvals, merge queues, etc.
For all PRs manually do the following before merging:
- Ask for a code review, do not merge if not peer-reviewed.
- Look at the CDK diffs to ensure changes are safe.
- Fix failed validation and tests.
#PR to develop
- PR branches: Anything ->
develop - PR name: Follow conventional commit, example:
feat: the cool new thing. If you track tickets with something external like Jira, include the ticket number in the commit message. That enables a reverse lookup/search between GitHub and your ticketing system allowing anyone to do a lookup and see what ticket the changes relates to. - Merge type: Squash commit. There are likely multiple small commits in your PR, by squashing you create neat/clean
history on the
developbranch and it also allows your work to be rolled back easily. - Example: https://github.com/rehanvdm/cdk-starter/pull/5
#PR to stage
- PR branches:
develop->stage. Thedevelopbranch should be the only branch that gets merged intostage. - PR name:
release(stage): develop to stage - Merge type: Merge commit. This preserves the feature branch commits from
developand makes them visible on thestagebranch. - Example: https://github.com/rehanvdm/cdk-starter/pull/6
#PR to prod
- PR branches:
stage->main. Thestagebranch should be the only branch that merges intomain. - PR name:
release(prod): stage to main - Merge type: Merge commit. This preserves the feature branch commits from
developand makes them visible on themainbranch. - Example: https://github.com/rehanvdm/cdk-starter/pull/7
#GitHub AWS OIDC authentication
The GitHub to AWS authentication is done using IAM roles. The role is set up to be assumable by GitHub for certain repos, branches, environments, etc. This role is usually created manually to prevent a chicken and egg situation. Read this blog from AWS on the process: Use IAM roles to connect GitHub Actions to actions in AWS
At a bare minimum, your role needs the following trust policy and statement policies to deploy CDK. Make replacements
with your values below, note that if you CDK bootstrapped your account, then you have the cdk-hnb659fds-XXX roles
that are used for deployment.
The following trust policy gives all repos access to assume the role:
{
    "Version": "2012-10-17",
    "Statement": [
        {
            "Effect": "Allow",
            "Principal": {
                "Federated": "arn:aws:iam::111111111111:oidc-provider/token.actions.githubusercontent.com"
            },
            "Action": "sts:AssumeRoleWithWebIdentity",
            "Condition": {
                "StringEquals": {
                    "token.actions.githubusercontent.com:aud": "sts.amazonaws.com"
                },
                "StringLike": {
                    "token.actions.githubusercontent.com:sub": "repo:GITHUB_USERNAME_OR_ORGANISATION_NAME/*"
                }
            }
        }
    ]
}
The following IAM policies give permissions that allows the role to assume the CDK roles:
{
    "Version": "2012-10-17",
    "Statement": [
        {
            "Sid": "AssumeCdkRoles",
            "Effect": "Allow",
            "Action": [
                "sts:AssumeRole",
                "iam:PassRole"
            ],
            "Resource": "arn:aws:iam::111111111111:role/cdk-hnb659fds-*"
        }
    ]
}#Conclusion
This article is considered an updated and more complete solution provided by 4 Methods to configure multiple environments in the AWS CDK. We covered topics like configuration, environments, build systems, CI/CD processes and GitHub Workflows that are needed to go beyond a “hello world” CDK application. Stay tuned for posts that will further improve the CDK starter project.