4 Methods to configure multiple environments in the AWS CDK

In this post I will explore 4 different methods that can be used to pass configuration values to the AWS CDK. We will first look at using the context variables in the cdk.json file, then move those same variables out to YAML files. The third method will read the exact same config via SDK(API) call from AWS SSM Parameter Store. The fourth and my favourite is a combination of two and three in conjunction with using GULP.js as a build tool.
‼️ An UPDATED and more complete solution has been published here: AWS CDK starter project - Configuration, multiple environments and GitHub CI/CD . It’s considered an evolution of the methods mentioned here after many years of using CDK. At the very least read the configuration and multiple-environments sections.
The accompanying code for this blog can be found here: https://github.com/rehanvdm/cdk-multi-environment
#1. The CDK recommended method of Context
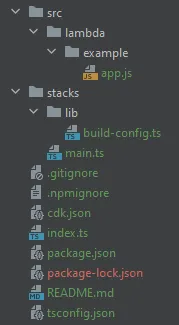
The first method follows the recommended method of reading external variables into the CDK at build time. The main idea behind it is to have the configuration values that determine what resources are being built, committed alongside your CDK code. This way you are assured of repeatable and consistent deployments without side effects.
There are few different ways to pass context values into your CDK code. The first and easiest might be to use the context variables on the CDK CLI command line via --context or -c for short. Then in your code you can use construct.node.tryGetContext(…) to get the value. Be sure to validate the returned values, TypeScripts (TS) safety won’t cut it for reading values at runtime, more in the validation section at the end. Passing a lot of variables like this isn’t ideal so you can also populate the context from file.
When you start a new project, every cdk.json will have a context property with some values already populated that are used by the CDK itself. This was my first pain point with using this method, it just didn’t feel right to store parameters used by the CDK CLI in the same file as my application configuration (opinionated). Note that it is possible to also store the .json file in other places, please check out the official docs (link above) for more info.
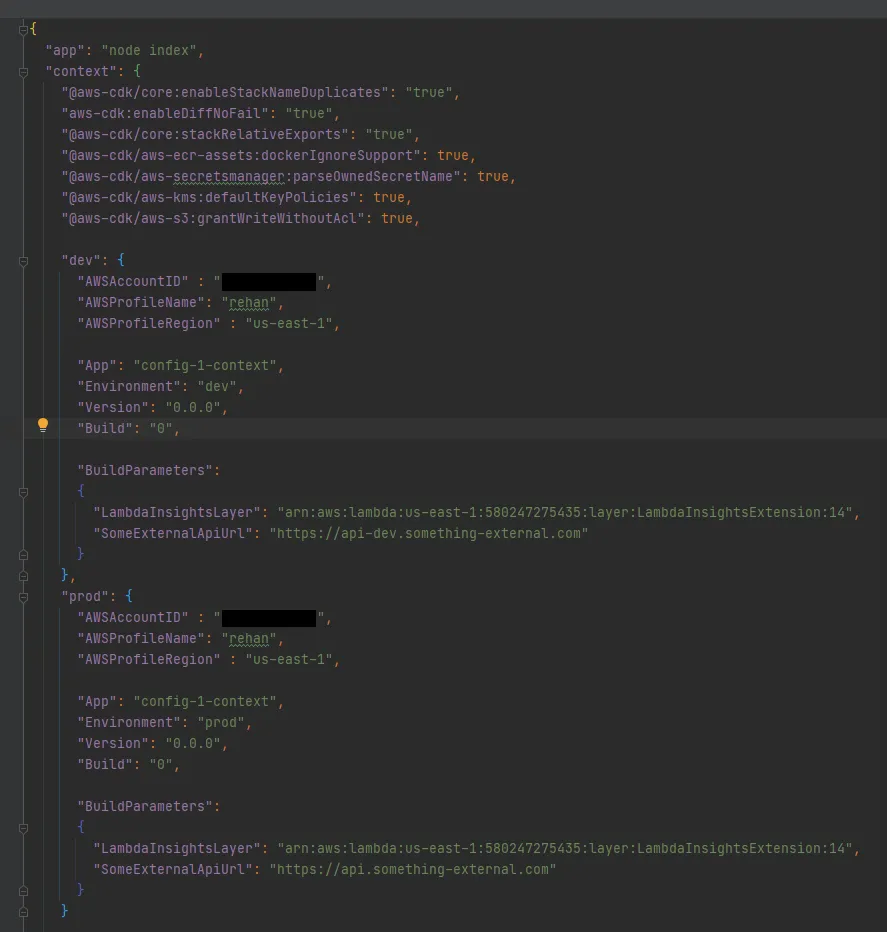
We are storing both development and production configuration values in the same file. Then when executing the CDK CLI commands we pass another context variable called config.
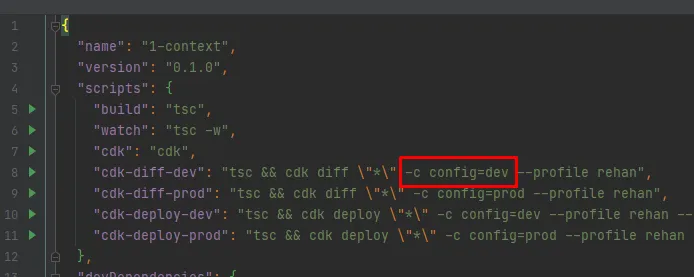
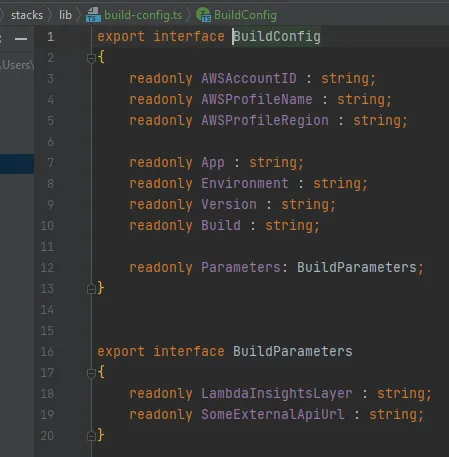
This is read within index.ts and it chooses one of the available environment configurations as defined in our cdk.json file. It is all done inside the getConfig(…) function, notice that we read each context value individually and assign them to our own BuildConfig interface, located at /stacks/lib/build-config.ts
An instance of the buildConfig is then passed down to every stack , of which we only have one in this example. We also add tags to the CDK app which will place them on every stack and resource when/if possible. Passing the region and account to the stack enables us to deploy that specific stack to other accounts and/or regions. Only if the --profile argument passed in has the correct permissions for that account as well.
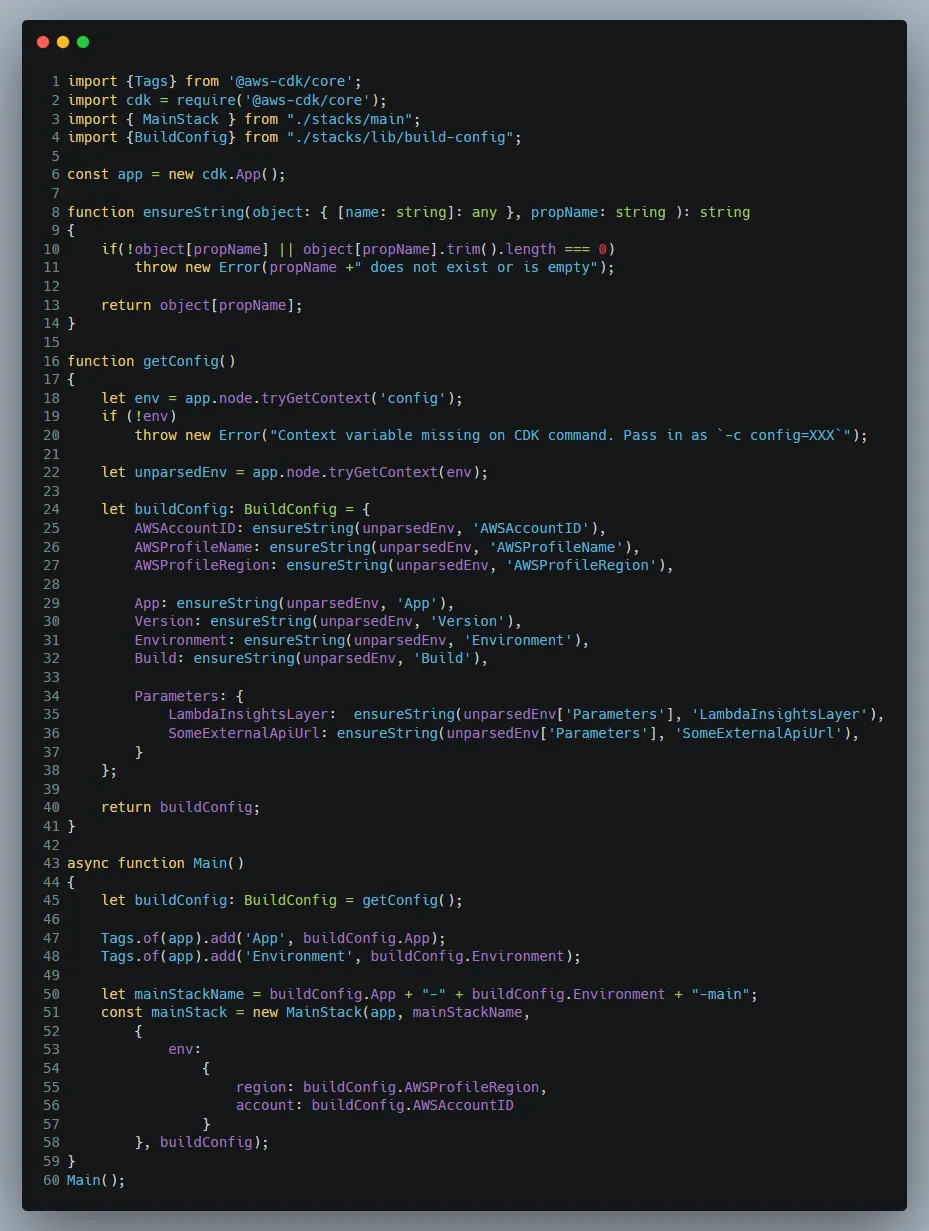
The next methods all have the exact same code and structure the only differences are the getConfig function and execution of CLI commands.
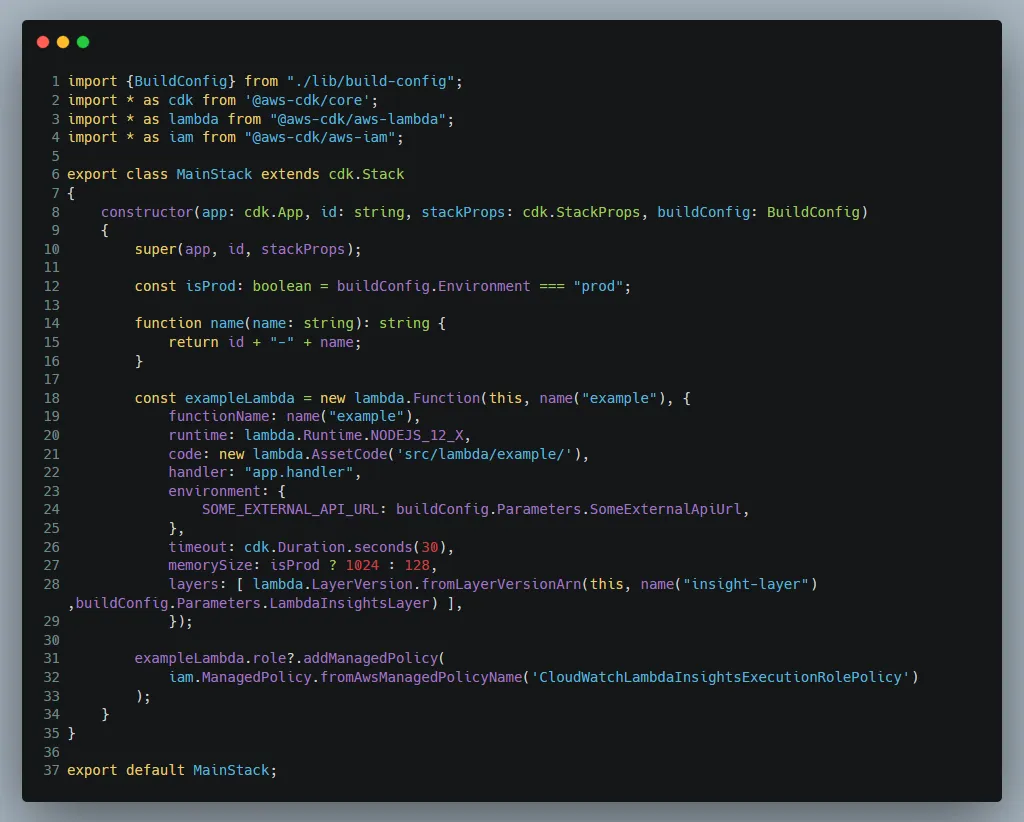
The MainStack (below) that we are deploying has a single Lambda in it, with a few ENV variables and the Lambda Insights Layer of which we all get from the config file.
#2. Read config from a YAML file
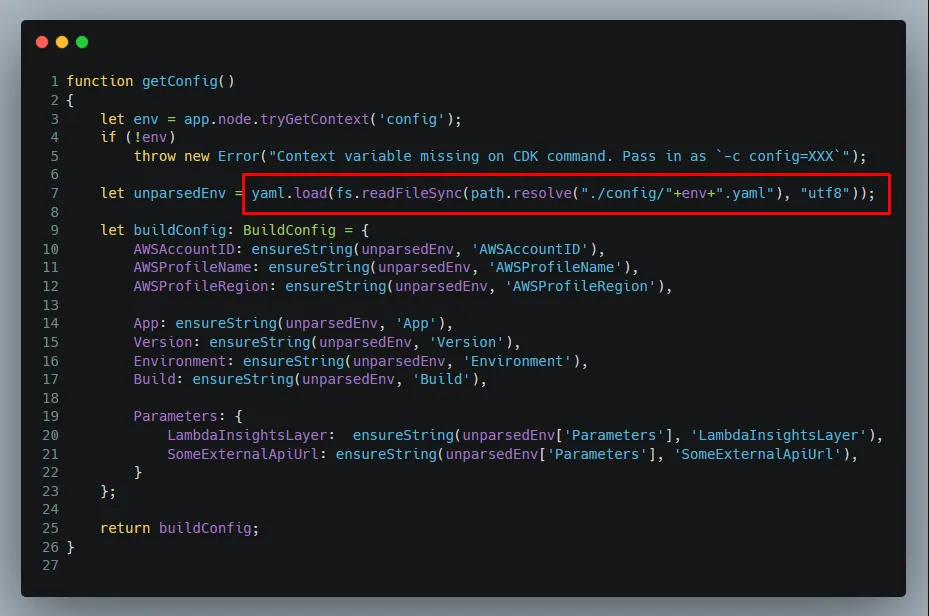
With this method we split our application configuration from the CDK context file and store it in multiple YAML files. Where the name of the file indicates the environment.

Then a slight change in our index.ts for the getConfig function so that it reads and parses the new YAML files instead of the JSON from the context.
#3. Read config from AWS SSM Parameter Store
This method is not limited to just the AWS SSM Parameter Store but any third-party API/SDK call can be used to get config and plug it into the CDK build process.
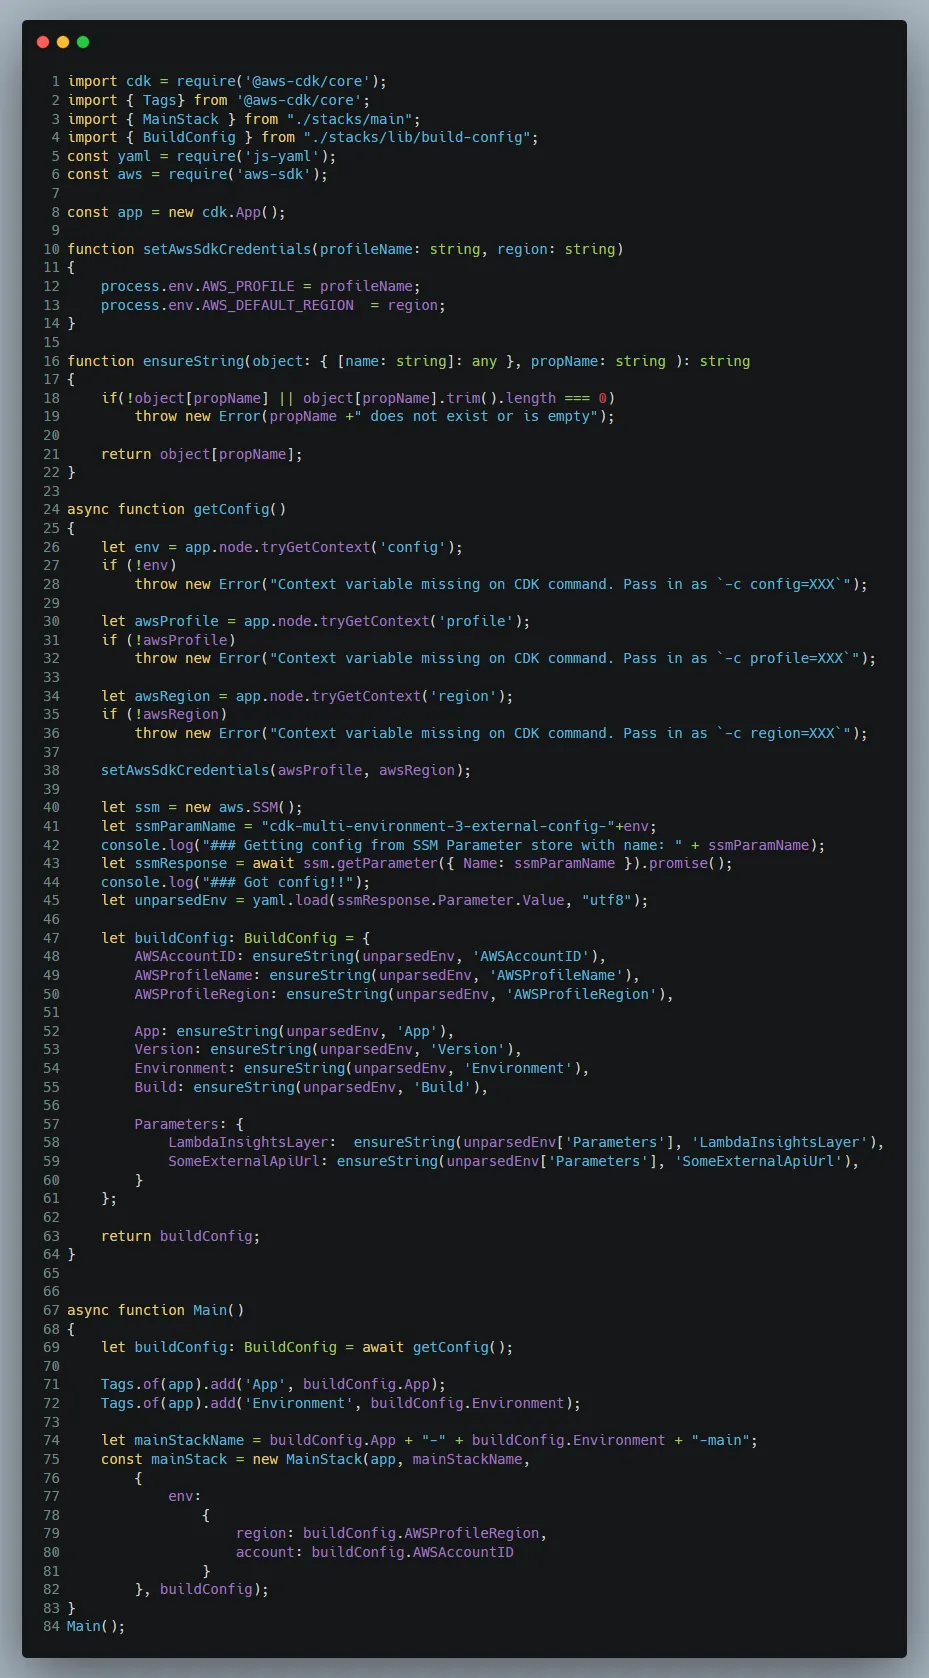
The first “trick” is to wrap all the code inside an async function , and then execute it. Now we can make full use of async/await functions before the stack is created. Inside the getConfig(…) function we now also require that the profile and region context variables be passed when executing the CLI commands.

This is so that we can set them to be used by the AWS SDK which in return makes authenticated API calls to AWS for us. We created the SSM Parameter Store record (below) with the exact same content as the YAML files. So that after retrieving it, we parse and populate the BuildConifg exactly the same as we did for the YAML files method.
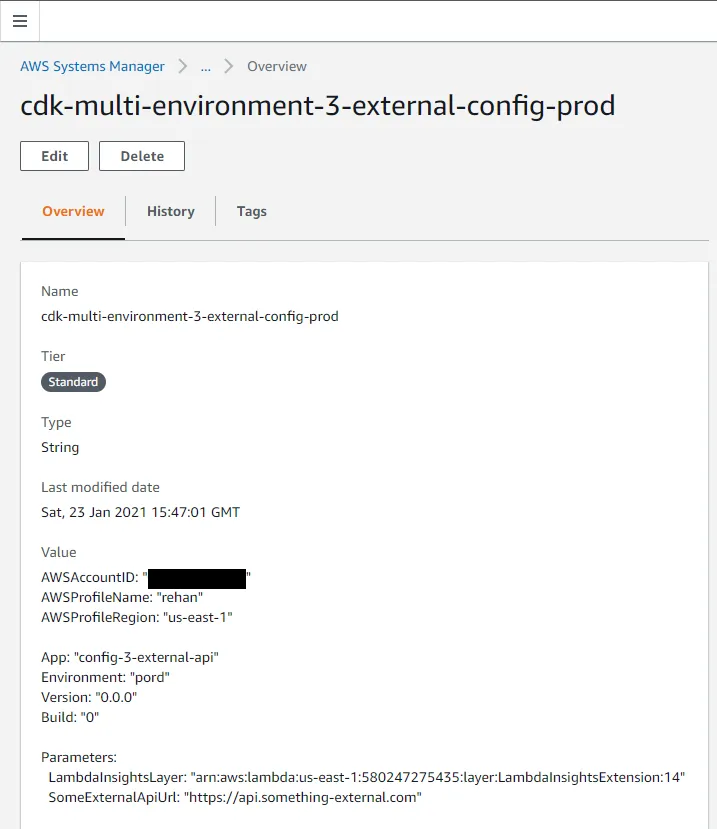
This method has the advantage that your configuration file is now independent of any project , is stored in a single location and can even be used by multiple projects. Storing the complete project config like this is a bit unorthodox and not something that you will do often. You would ideally store most of the config on a project level and then pull a few global values used by all projects , more on this in the next method.
#4. Make use of an external build script with both local and global config
In this example make use of method 3 and 4 above by having:
- Project config (YAML file), for this project, including AWS profile and region.
- A global config (AWS SSM Parameter Store) to be used by all projects.
We only store the Lambda Insight Layer ARN in our global config which is AWS SSM Parameter store. So that when AWS releases a new version of the layer, we can just update it in our global config once and all projects will update their usage of it the next time they are deployed.
We are using of a GULP.js script and executing it with Node. It basically does the following :
- Reads the local YAML config file, depending on the environment, this defaults to the branch name.
- Get the AWS SSM Parameter Name (from the local config) which holds the global config. Fetch the global config and add to the local config.
- Validate the complete configuration, with JSON Schema using the AJV package.
- Write the complete config to file to disk so that it is committed with the repo.
- Run npm build to transpile the CDK TS to JS.
- Build and execute the CDK command by passing arguments like the AWS profile and config context variable. When the CDK is synthesised to CloudFormation in the
index.ts, just like before in method 2, it will read the complete config that we wrote to disk at step 4.
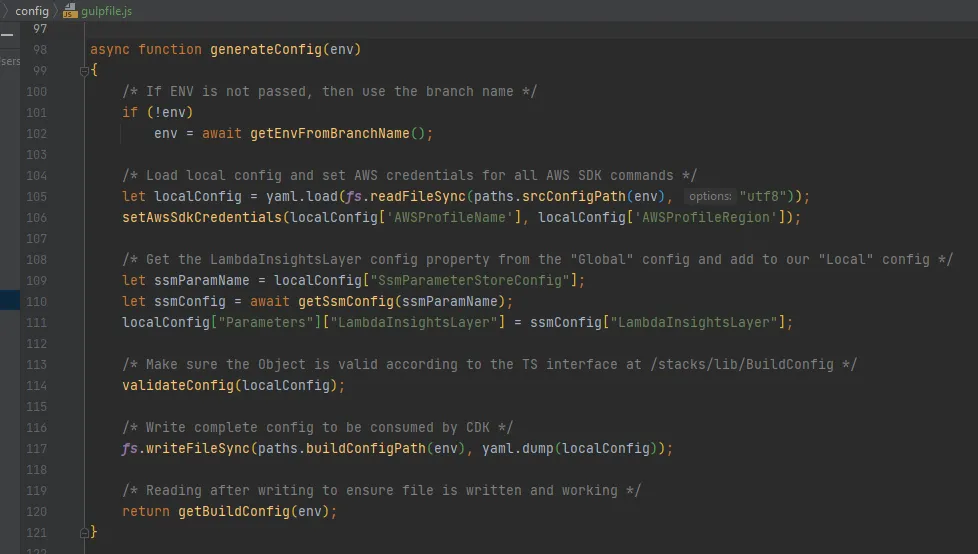

Now instead of running npm run cdk-diff-dev, we run:
node node_modules\gulp\bin\gulp.js --color --gulpfile config\gulpfile.js generate_diff
and for deploying:
node node_modules\gulp\bin\gulp.js --color --gulpfile config\gulpfile.js deploy_SKIP_APPROVALNotice that we don’t pass the environment in these commands and let it default to the branch name , with the exception that if on the master branch it uses the prod config. The getConfig(…) function within the GULP.js file allows for this to be passed down explicitly. This deployment method also works on CI tools.
The getConfig function used in the index.ts is similar to method 2, except that it does validation using AJV and JSON Schema (see section below on validation).
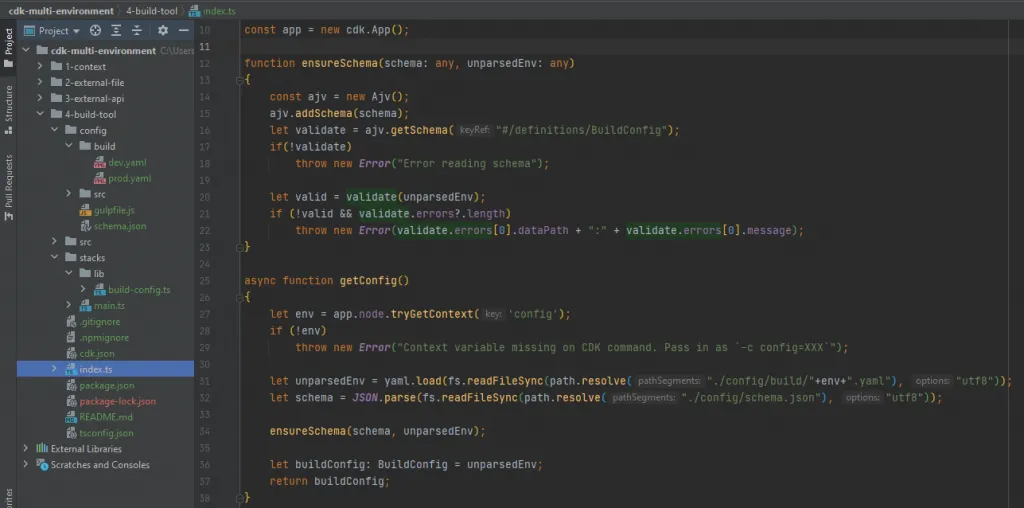
One of the biggest advantages of using a GULP.js file and executing it with Node is that it makes our deployment process operating system (OS) independent. This is important to me since I am on Windows and most people always write Make and Bash scripts forcing me to use the Ubuntu WSL2.
One of the biggest advantages of using a GULP.js file and executing it with Node is that it makes our deployment process OS independent.
This deployment process is quite versatile. I have used this GULP.js method from before I was using Infrastructure as Code (IaC) tools, back when we only wanted to update Lambda code. Some form of it has since been used to deploy CloudFormation , then SAM and now the AWS CDK.
#A few words about:
#Validation
TypeScript only does compile time checking, which means it does not know if that YAML/JSON that you are decoding is actually a string or defined at runtime. Thus, we need to manually verify and put safe guards in place at runtime. Method 1 through 3 just did a basic check within the index.ts using function ensureString(…) where the config is read.
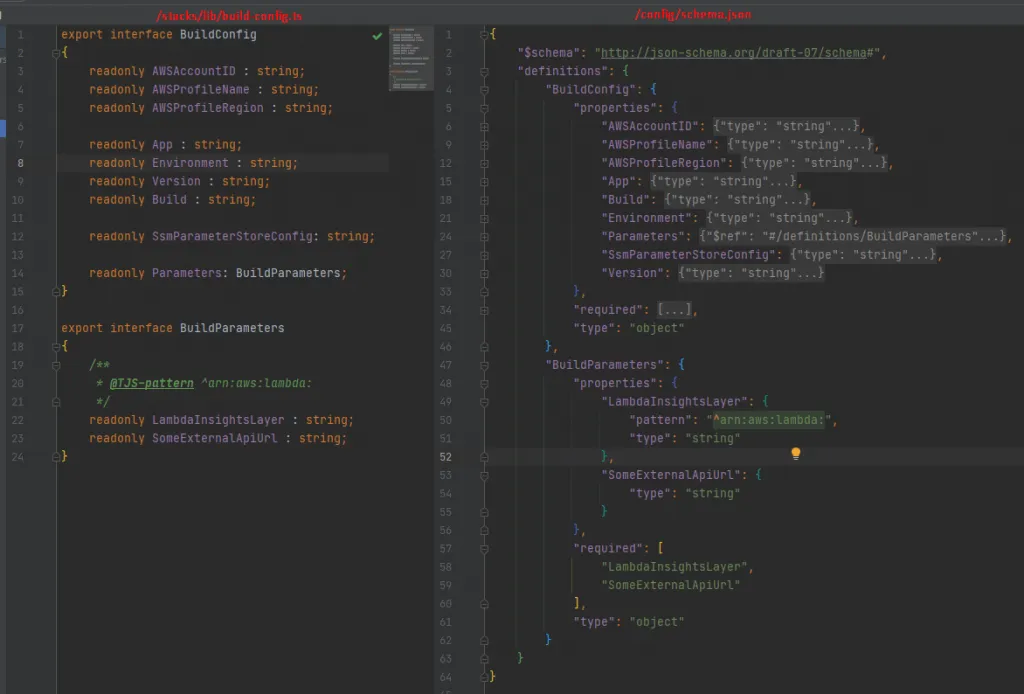
For this method we are using a slightly more advance approach. The AJV package validates a JSON object against the JSON Schema of our BuildConfig file. This way we can write a single schema file that defines rules like ensuring certain properties are set and start with the correct AWS ARN.
Writing JSON Schema and keeping it up to date is cumbersome, that is why we opted to use the typescript-json-schema package. It converts our already existing TypeScript BuildConfig interface (at /stacks/lib/build-config.ts) into a JSON Schema and stores it in the config directory at /config/schema.json. Now when the GULP.js and index.ts files read the config, they both validate it against this JSON Schema.
#Project structure
If you are following along with the code, you will also notice that I don’t structure my CDK projects like the initial/standard projects.
This again is opinionated , but the initial structure doesn’t seem logical to me and doesn’t always work for every project.
All stacks go into /stacks, the main CDK construct is on the root as index.ts and all application specific code goes into /src. The /src dir will have sub directories for things like /lambda, /docker, /frontend as long as it makes logical sense. Then not displayed here is the sometimes needed /build dir where the /src code gets built for production and stored. The CDK then reads from the /build instead of/src.
#Conclusion ( TL;DR )
‼️ An UPDATED and more complete solution has been published here: AWS CDK starter project - Configuration, multiple environments and GitHub CI/CD . It’s considered an evolution of the methods mentioned here after many years of using CDK. At the very least read the configuration and multiple-environments sections.
The accompanying code for this blog can be found here: https://github.com/rehanvdm/cdk-multi-environment
There are many different ways to store config for a CDK project. With my favourite being the last method of storing them as YAML files at project level and using a GULP.js script as a build tool. Which ever method you choose, always remember to validate the inputs.